Monday, September 21, 2015

ORACLE 11G DBA and SQL basics

WHAT IS ORACLE 11G?

Oracle 11G is a small/medium level database (RDBMS) which provides efficient and effective solutions for handling database and its data. It is based on Client/Server architecture.

What is SQL?
SQL stands for Structured Query Language which is used to communicate with a database (mainly RDBMS). Operations like create, delete, update, retrieve data from database can be performed.
Few RDBMS that use SQL are: Oracle, Sybase, Microsoft SQL Server, Access, etc.

Features of SQL:
  • It is a Non-Procedural language.
  • It is a common language to interact with any type of Database such as Oracle, DB2 etc
  • It is not a case sensitive language
Sub-languages of SQL:
It is mainly divided into five types:
  • Data Definition Language (DDL)
  • Data Manipulation Language (DML)
  • Data Retrieval Language (DRL)
  • Transaction Control Language (TCL)
  • Data Control Language (DCL)

Data Types in SQL:

Data types: They tell the operating system that what type of data (char, number, float and so on) is stored in the memory.

  • Character Data Type:

Data Type Syntax
Oracle 11g (maximum size in bytes)
Explanation
Frequency Of Use
Char(size)
2000
Stores characters and has fixed length string. Space padded
High
Nchar(size)
2000
Stores characters and has fixed length NLS string Space padded
Low
Nvarchar2(size)
4000
Variable length string
Low
Varchar2(size)
4000
Variable length NLZ string
High
Long
2GB
Variable length string
Low
Raw
2000
Variable length binary string
medium
Long raw
2GB
Variable length binary string
low

  •  Numeric Data Type:

Data Type Syntax
Explanation
Frequency Of Use
Number(size)
Stores numeric values
High
Float
Stores numeric values decimal values included
High
Decimal
Stores numeric values decimal values included
High
Integer
Stores numeric values decimal values included
High
Real
Stores numeric values decimal values included
High
Double precision
Stores numeric values decimal values included
medium
des
Stores numeric values
low

Operators in SQL:

Operator: It is a special symbol which performs some operation on operands.

Arithmetic Operators:
Operator
Description
Method Of Use
Example
+
Addition
A+B
10+2=12
-
Subtraction
A-B
10-2=8
*
Multiplication
A*B
10*2=20
/
Division gives quotient
A/B
10/2=5
Mod
remainder
mod(A,B)
Mod(15,2)=1

Logical Operators: manipulate results of conditions
Operator
Description
NOT
Returns TRUE if the condition is FALSE and vice versa and if the result is unknown it returns unknown
AND
Returns TRUE if both component conditions are TRUE and FALSE if any one condition is FALSE
OR
Returns TRUE if anyone component conditions are TRUE and FALSE if both condition is FALSE

Relational Operators: (Basic Set)
Operator
Description
=
Assignment and Equal to operator
!=  , ^= , <>
Not Equal
> 
Greater than
> 
Lesser  than
>=
Greater than or Equal to
<=
Lesser than or Equal to

Relational Operator: 
Operator
Description (working can be understood when solving problems based on it which is in later part)
In
“Equivalent to any member of”. Equivalent to”=ANY”
Not in
Equivalent to “!=ANY”
ANY / SOME
Compares a value to each value in a list. Must be used with relational operator (basic set). Evaluates to FALSE if the list returns no rows
All
Compares a value to each value in a list. Must be used with relational operator (basic set). Evaluates to TRUE if the list returns no rows
Between / Not between
[not]Between x and y
[not]Greater than or equal to x and less than or equal to y
Like / Not like
TRUE if x does [not] match the pattern y
Is null / Is not null
Test for nulls. Only used to test for null
Exists / not exists
True if a sub-query returns at least one row
True if a sub-query returns no row
||
Concatenates character string


Friday, April 24, 2015

NOOB'S INTRODUCTION TO MICROCONTROLLER

Well many people ask me how should i approach micro controllers, how can i get a good understanding of them and develop logic and programming skills.
Face it you are a electronic hobbyist and you want to create something new to play with so for all those who want to get started with micro controllers follow these simply rules and you will be pro's in no time.

RULES:

1. Search:
Well searching is something very important, by searching we can find people who share similar interest or simply find projects followed with comments or simple we find ideas to begin or learn something all new.

2. Start with simple micro controllers:
Now lets pick a good micro controller to start with i say go for 8051 or ARDUINO as a start up. But to tell the truth i like to start with 8051 as it freely available and teaches you core basics of micro controllers. Its one of the most popular micro controller out in the market. Apart from being mostly used it has a large form support,large number of projects online to start with. Start with Assembly language(8051 NOT ARDUINO) and move to C by this technique you will understand the flow of the code and can tell what's happening inside a micro controller at any time. This will teach you how electronic gadgets/robots etc work how to design a gadget/Robot and help you to design codes in blocks called modular programming. YOU CAN ALSO LOOK FOR DEVELOPMENT BOARDS i am not going to tell about them today as it needs a good explanation, so i will arrange them on some other day.
  
3. Learn basics:
Well most people think working on micro controller's are tough, but the truth is its opposite, working with simple components is tough as they don't work on 0's and 1's so controlling them require knowledge of the component and working principle's related to it and basic circuit diagram to start understanding.I will really stress when you work with basic try to understand how potential and current is varying in the circuit this will give you very good understanding how a circuit works and will help you to design complex circuits.

Tuesday, April 7, 2015

SERIAL PERIPHERAL INTERFACE [SPI]:

IN TODAY'S POST LETS SEE WHAT IS SPI. For programming part see SPI tutorial in Arduino

introduction:

Serial peripheral interface [SPI] is an interface bus commonly used to send data b/w microcontroller and small peripherals such as shift registers, sensors, SD cards and other controllers.It uses separate clock and data lines and differentials devices using select lines.

What's the difference b/w Serial Ports?

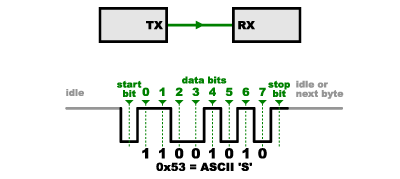
Serial ports normally use TX and RX lines which are "asynchronous"and there is no control over when data is sent or Guarantee that they are receiving the data at the same time or following at a same rate. So they should have same clock  else they will not communicate properly. So to handle this problem asynchronous serial connections add extra start and stop bits to each byte to help receiver to sync with each other.
Asynchronous serial waveform
(By the way, plz  noticed that "11001010" does not equal 0x53 in the above diagram.Serial protocols will often send the least significant bits first, so the smallest bit is on the far left.The lower nubble is actually 0011=0x3, and upper nybble is 0101=0x5.)

SPI: AS SOLUTION

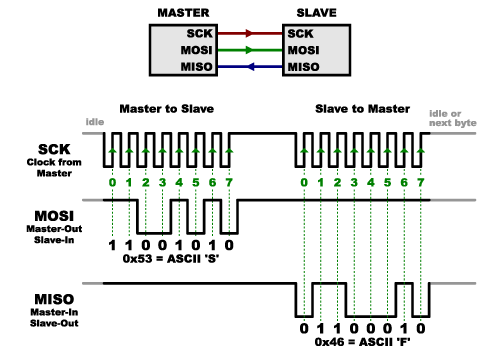
SPI works in a slightly different manner. it's a "synchronous" data bus, which means that it uses separate lines for data and a "clock" that keeps both sides in perfect sync. The clock acts like a indicator to the receiver. HOW WILL THE RECEIVER KNOW WHEN THE DATA IS COMING? ITS SIMPLE IT KNOW THAT BOTH THE CLOCK AND DATA COME AT THE SAME TIME.
alt text
One reason that SPI is so popular is that the receiving hardware an be a simple shift register. This is a much simpler piece of hardware that the full-up UART (Universal Asynchronous Receiver/ Transmitter) that asynchronous serial requires.

Receiving Data:

Sending data may seem really simple where as Receiving data is slightly complicated.In SPI, only one side generates the clock signal (usually called CLK or SCK for Serial Clock). The side which generates the clock is called the "master", and the other side is called the "slave" which can be many.

When data is sent from the master to a slave, it's sent on a data line called MOSI, for "Master Out/ Slave In". If the slave needs to send a response back to the master, the master will continue to generate a prearranged number of clock cycles, and the slave will put the data onto a third data line called MISO, for "Master In / Slave Out".
alt text
Notice we said "prearranged" in the above description.We know when the master gets the data from the slave so we need to give clock cycles at that moment to receive them.For example we know by sending command "read data " we know some data is coming so we will allot some clock cycles.

Slave Select(SS):

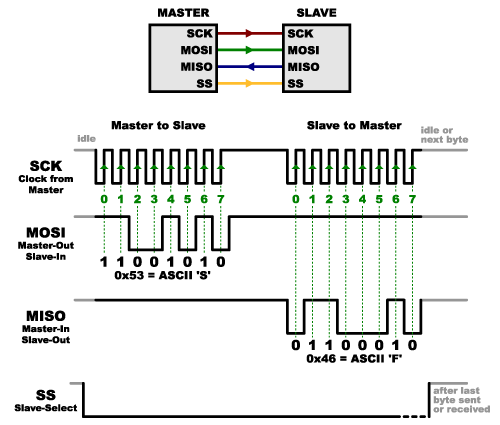
Now the last pin we need to know is the Slave Select which tells the device when to wake up and receive or send data.
alt text
This line is active low that means we need to give a "logic 0" to enable it.Now how to use it ?
When sending a data we make the pin low and send the data after sending we make the pin high and disconnect the device.

Multiple Slaves:

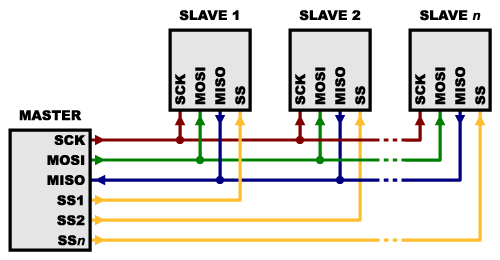
  1. By giving each slave a separate SS lines. By enabling and disabling that SS line we can control that particular slave.
alt text

Tips:

  • Because of the high speed signals, SPI should only be used to send data over short distances.
  • For long distance communications decrease the clock speed and consider using SPI drivers etc.

Friday, March 27, 2015

[SOLVED] avrdude: ser_open(): can't set com-state for "\\.\COM6"

CAUSE:

once upon a time when i was noob in Arduino i tried to connect my Arduino and computer with the help of Processing and tried to change the color of the display screen with the help of potentiometer.
In this process something went wrong and the display on the screen started to flicker. Ignoring that i tried again at that time my led on Rx pin started glowing continuously and then kept quite after sometime i was able to connect the Arduino but couldn't write to it. Every time i tried to write to it,it gave the same error with  msg (avrdude: ser_open(): can't set com-state for "\\.\COM6").

Noticing that i tried to solve it in many ways:
1. Pressing reset with different time intervals
2. Connecting to different ports
3. Connecting to different computers
4. Checking connectivity

But nothing worked so i thought that i have shorted the board and have to buy one. Then i thought if my Arduino was shorted then it shouldn't be able to be connected my computer as the controller or some circuit got shorted but it was connecting so  then i got the idea how to resolve it.

SOLVED:

  1. Reset the Arduino by pressing reset button.
  2. Uninstall all the Arduino compiler files including the drivers from the device manager of your computer. PLZ note the com port of Arduino in the device manager.
  3. Connect and check whether the Arduino is shown in device manager if shown then uninstall it manually
  4. Re install the Arduino compiler and hook up Arduino to it.
  5. Re install all the Drivers
  6. At this time you will see that the com port had changed if it didnt then change it manually from device manager 
  7. Cross your fingers and write the blink code to.
  8. Now this should work properly

ANALYSIS:

what i understood is that the msg goes something like this the device cant access the files relate to Arduino(avrxxxx)which is located in the com(xxx) port and the port status cant be updated with the current new values so resolve it manually.

Note: this should work in most cases including varies other errors which prevent from writing to the Arduino board.

Thursday, March 26, 2015

INTRODUCTION TO I2C PROTOCOL

I2C: Stands for inter-integrated circuit. It is a protocol intended to allow multiple "slave" digital integrated circuits (“chips”) to communicate with one or more “master” chips.It is only intended for short distance communications within a single device.It uses only two active signal lines (serial Data (SDA) & serial clock (SCL) ) which are bidirectional  to exchange information b/w various devices.
The protocol defines:
-7 bits slave addresses: each device connected to the bus has got such a unique address 
- data divided into into 8-bit + 1 (ACK/NACK)
-a few control bits for controlling the communication start, end, direction and for an acknowledgment mechanism.
Data rate has to be chosen depending on the ic but for most it varies b/w 100~400kbps.

HOW I2C PROTOCOL WORKS:

At any given time the device that is transmitting the data acts as the master while rest act as slaves.So first the master issues a start condition. This acts as an 'attention' signal to all the connected devices and all will wait for the incoming data. Then the master sends the Address of the device it wants to access, along with an write or read command.Now all the ic's will compare their address with the incoming address and if it matches they produce a acknowledge signal. If it doesn't match they wait for the stop condition so as to take the bus.
Once the master receivers the acknowledge, it can start transmitting or receiving DATA with the help of R/W. After the operation it sends a stop condition releasing the bus.
I2C specifies states that data may only change on the SDA line if the SCL clock signal is at low level.
Details (2) on I2C protocol

I2C at the Hardware Level

Signals

Each I2C bus consists of two signals: SCL and SDA. SCL is the clock signal, and SDA is the data signal. The clock signal is always generated by the current bus master; some slave devices may force the clock low at times to delay the master sending more data (or to require more time to prepare data before the master attempts to clock it out). This is called “clock stretching” and is described on the protocol page.
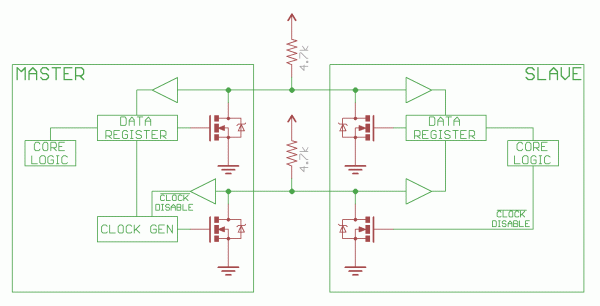
Unlike UART or SPI connections, the I2C bus drivers are “open drain”, meaning that they can pull the corresponding signal line low, but cannot drive it high. Thus, there can be no bus contention where one device is trying to drive the line high while another tries to pull it low, eliminating the potential for damage to the drivers or excessive power dissipation in the system. Each signal line has a pull-up resistor on it, to restore the signal to high when no device is asserting it low.
Equivalent internal circuit diagram of an I2C system.
Notice the two pull-up resistors on the two communication lines.
Resistor selection varies with devices on the bus, but a good rule of thumb is to start with 4.7k and adjust down if necessary. I2C is a fairly robust protocol, and can be used with short runs of wire (2-3m). For long runs, or systems with lots of devices, smaller resistors are better.

Signal Levels

Since the devices on the bus don’t actually drive the signals high, I2C allows for some flexibility in connecting devices with different I/O voltages. In general, in a system where one device is at a higher voltage than another, it may be possible to connect the two devices via I2C without any level shifting circuitry in between them. The trick is to connect the pull-up resistors to the lower of the two voltages. This only works in some cases, where the lower of the two system voltages exceeds the high-level input voltage of the the higher voltage system–for example, a 5V Arduino and a 3.3V accelerometer.

Protocol

Communication via I2C is more complex than with a UART or SPI solution. The signalling must adhere to a certain protocol for the devices on the bus to recognize it as valid I2C communications. Fortunately, most devices take care of all the fiddly details for you, allowing you to concentrate on the data you wish to exchange.

Basics

Standard 7-bit address transfer message.


Messages are broken up into two types of frame: an address frame, where the master indicates the slave to which the message is being sent, and one or more data frames, which are 8-bit data messages passed from master to slave or vice versa. Data is placed on the SDA line after SCL goes low, and is sampled after the SCL line goes high. The time between clock edge and data read/write is defined by the devices on the bus and will vary from chip to chip.

Start Condition

To initiate the address frame, the master device leaves SCL high and pulls SDA low. This puts all slave devices on notice that a transmission is about to start. If two master devices wish to take ownership of the bus at one time, whichever device pulls SDA low first wins the race and gains control of the bus. It is possible to issue repeated starts, initiating a new communication sequence without relinquishing control of the bus to other masters; we’ll talk about that later.

Address Frame

The address frame is always first in any new communication sequence. For a 7-bit address, the address is clocked out most significant bit (MSB) first, followed by a R/W bit indicating whether this is a read (1) or write (0) operation.
The 9th bit of the frame is the NACK/ACK bit. This is the case for all frames (data or address). Once the first 8 bits of the frame are sent, the receiving device is given control over SDA. If the receiving device does not pull the SDA line low before the 9th clock pulse, it can be inferred that the receiving device either did not receive the data or did not know how to parse the message. In that case, the exchange halts, and it’s up to the master of the system to decide how to proceed.

Data Frames

After the address frame has been sent, data can begin being transmitted. The master will simply continue generating clock pulses at a regular interval, and the data will be placed on SDA by either the master or the slave, depending on whether the R/W bit indicated a read or write operation. The number of data frames is arbitrary, and most slave devices will auto-increment the internal register, meaning that subsequent reads or writes will come from the next register in line.

Stop condition

Once all the data frames have been sent, the master will generate a stop condition. Stop conditions are defined by a 0->1 (low to high) transition on SDA after a 0->1 transition on SCL, with SCL remaining high. During normal data writing operation, the value on SDA should not change when SCL is high, to avoid false stop conditions.

Advanced Protocol Topics

10-bit Addresses

10-bit address frames example.
In a 10-bit addressing system, two frames are required to transmit the slave address. The first frame will consist of the code b11110xyz, where ‘x’ is the MSB of the slave address, y is bit 8 of the slave address, and z is the read/write bit as described above. The first frame’s ACK bit will be asserted by all slaves which match the first two bits of the address. As with a normal 7-bit transfer, another transfer begins immediately, and this transfer contains bits 7:0 of the address. At this point, the addressed slave should respond with an ACK bit. If it doesn’t, the failure mode is the same as a 7-bit system.
Note that 10-bit address devices can coexist with 7-bit address devices, since the leading ‘11110’ part of the address is not a part of any valid 7-bit addresses.

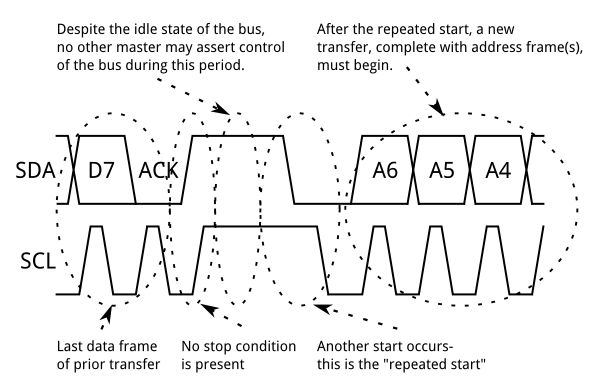
Repeated Start Conditions

A repeated start condition.
Sometimes, it is important that a master device be allowed to exchange several messages in one go, without allowing other master devices on the bus to interfere. For this reason, the repeated start condition has been defined.
To perform a repeated start, SDA is allowed to go high while SCL is low, SCL is allowed to go high, and then SDA is brought low again while SCL is high. Because there was no stop condition on the bus, the previous communication wasn’t truly completed and the current master maintains control of the bus.
At this point, the next message can begin transmission. The syntax of this new message is the same as any other message–an address frame followed by data frames. Any number of repeated starts is allowed, and the master will maintain control of the bus until it issues a stop condition.

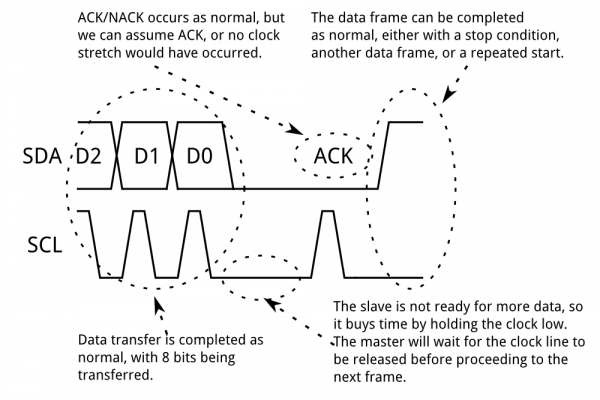
Clock stretching

A slave using clock stretching to delay the next data frame.
At times, the master’s data rate will exceed the slave’s ability to provide that data. This can be because the data isn’t ready yet (for instance, the slave hasn’t completed an analog-to-digital conversion yet) or because a previous operation hasn’t yet completed (say, an EEPROM which hasn’t completed writing to non-volatile memory yet and needs to finish that before it can service other requests).
In this case, some slave devices will execute what is referred to as “clock stretching”. Nominally, all clocking is driven by the master device–slaves simply put data on the bus or take data off the bus in response to the master’s clock pulses. At any point in the data transfer process, an addressed slave can hold the SCL line low after the master releases it. The master is required to refrain from additional clock pulses or data transfer until such time as the slave releases the SCL line.

ALSO CHECK OUT ARDUINO AND I2C TO KNOW HOW TO USE I2C COMMUNICATION 
Reference:
 1. http://www.byteparadigm.com/applications/introduction-to-i2c-and-spi-protocols/
 2. https://learn.sparkfun.com/tutorials/i2c
 3. http://www.uchobby.com/index.php/2008/09/16/introduction-to-i2c/
 4. https://courses.cs.washington.edu/courses/cse466/01au/Lecture/i2c.pdf
 5. http://i2c.info/
 6. http://www.embedded.com/electronics-blogs/beginner-s-corner/4023816/Introduction-to-I2C